Galaxy Buck Shuttle In Tolaris Craft
Here are the supplies and instructions for your kids to make their very own Shuttle in Planet Tolaris! You can download a PDF of the Galaxy Buck Shuttle In Tolaris Craft here.
- Coffee filter
- Markers
- Crayons
- Red and orange construction paper
- Black, red, and orange tempera or acrylic paint
- Paintbrush
- Glue (I prefer Scotch permanent stick glue)
- Scissors
- Cup
- Plate
- Old gift card or credit card
- Sand paper
- Kitchen sponge
- Cardboard scraps
The Shuttle in Tolaris project has been divided into three phases.
PHASE 1: Prepare Fire

To begin Phase 1 of the project, you will need a coffee filter, blue markers, a paintbrush, a cup of water, and a plate. The plate is very important because it will catch the excess water.

Step 1 – Take a coffee filter and flatten it onto the plate.

Step 2 – Use your markers to create designs on the coffee filter. You do not have to color the entire filter because the water will cause the ink to bleed.

Step 3 – Use your paintbrush to paint the entire coffee filter with water.
 Step 4 – Set aside to dry.
PHASE 2: Create Tolaris

To begin Phase 2 of the project, you will need red construction paper, sand paper, a paintbrush, a cup or plate to mix paint, a kitchen sponge, a gift card, and black and red tempera or acrylic paint.

Step 1 – Put black and red paint into a cup. Black paint is very powerful, so use just a tiny bit in comparison to your red paint.

Step 2 – Mix the paint until you get a color similar to maroon.

Step 3 – Use your paintbrush to apply many stripes of maroon paint.

Step 4 – Scrape the gift card over the brushstrokes before they dry to create a smooth sky effect.

Step 5 – Tear the sandpaper into rock shapes. Remember — rocks aren’t perfect!

Step 6 – Use your sponge and maroon paint to paint your rocks. You may use a paintbrush instead of a sponge if you wish.
 Step 7 – Arrange your rocks and glue to the paper. I would suggest using wet glue for this.
PHASE 3: Build The Shuttle

To begin Phase 3 of the project, you will need orange construction paper, cardboard scraps, a paintbrush, a cup to trace, crayons, scissors, and orange tempera or acrylic paint.

Step 1 – Trace the cup with a crayon or pencil.

Step 2 – Cut out the circle. Also cut along the bottom of the circle to create a flat bottom (as shown in the picture).

Also cut along the bottom of the circle to create a flat bottom (as shown in the picture).

Step 3 – Use your crayons to add details to the shuttle.

Step 4 – Take your cardboard scraps and draw two long ovals or rectangles. Next, cut them out.
 Step 5 – Paint the “jetpacks” (as we called them) with orange paint.

Step 6 – Remember that coffee filter from Phase 1? It’s time to bring it back out to make some fire.

Cut it into fire-like shapes and add to the bottom of your shuttle.

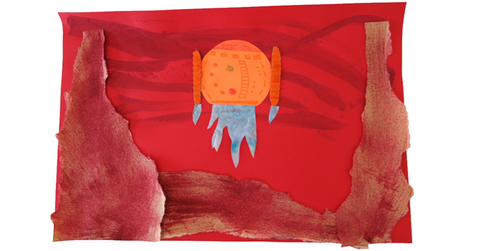
Step 7 – Glue all of the pieces to your shuttle to your paper. I suggest using the stick glue for this so your glue marks do not show through the coffee filter.

The completed Shuttle in Planet Tolaris!
 April Hohne is a graduate of Belmont University who began working as an Arts Specialist after college. A certified teacher in the areas of Music, Art and ESL, April loves guiding children through the journey of creating. She operates the Green Elephant Arts Studio in the Nashville, TN area.